

When I bought this radio, it was completely dead — only a dial light would dimly turn on, the tubes didn’t seem to light up, and I started to smell a burning odor coming from the power transformer… After I repaired it, it ended up working perfectly, with excellent selectivity and sensitivity, and very good sound quality. The members of the ‘El Válvulas’ forum helped me a lot during the repair process and also provided me with the schematics for the radio. This radio is from the year 1949 and has the following 6 vacuum valves/tubes:
| ECH21 | Mixer and oscillator |
| EAF42 | FI amplifier |
| EAF42 | Detector and audio preamplifier |
| EBL21 | Audio power amplifier |
| EM4 | Magic eye |
| AZ1 | High voltage rectifier |
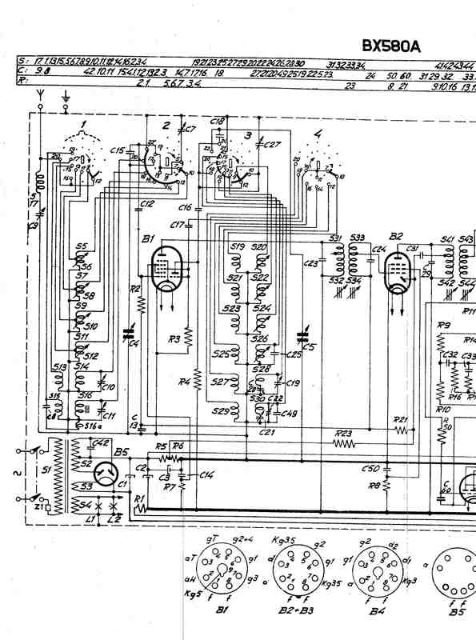
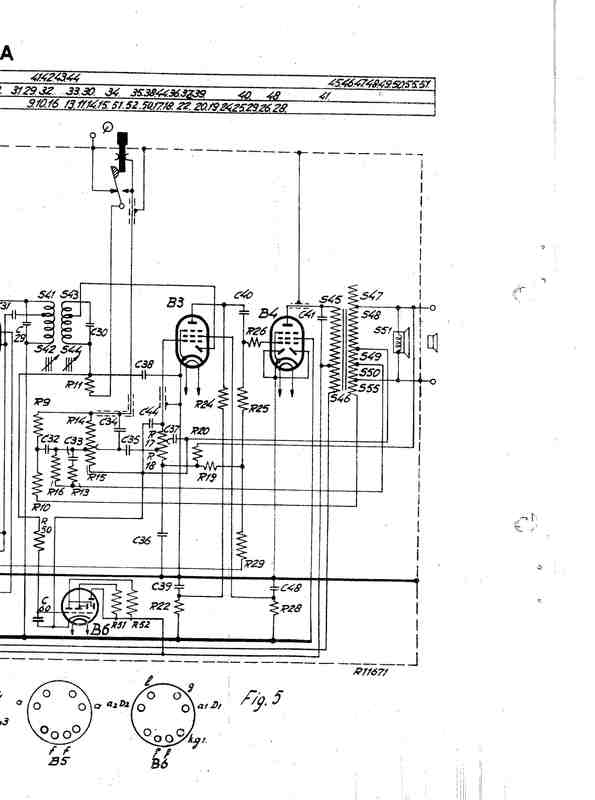
Here are the schematics for this radio:
The first thing I did was replace a burned-out dial bulb. Then I confirmed that the tubes indeed weren’t lighting up and the transformer was heating up, so I immediately checked capacitor C42. After testing it with a multimeter, I saw that it was completely shorted. I simply removed the capacitor, and after powering it on again, the dial bulbs lit up with normal brightness and some tubes were already glowing… However, the filaments of the EBL21 and the AZ1 didn’t light up.
I first checked the AZ1 — I had one with a globe-style glass envelope made by Philips. I didn’t even need to test it because I immediately saw that the filament was completely destroyed, so the only solution was to replace it. For the time being, I decided to substitute it with two 1N4007 diodes in series, along with 390-ohm 5W resistors.
The EBL21 also had an open filament and had to be replaced as well. While inspecting the tubes, I noticed that one of the EAF42s had been replaced with an ECH42. The ECH42 was in good condition, but it didn’t belong in that position, so I ordered a new EAF42 too.
While waiting for the new tubes, I started replacing all the paper and electrolytic capacitors in the radio before powering it on again. One possible reason the AZ1 had blown could have been leakage or a short in the filter capacitors, so I replaced them with new ones. I tried to fit them inside the original cans, but I couldn’t, so I had to leave them without their original housings.
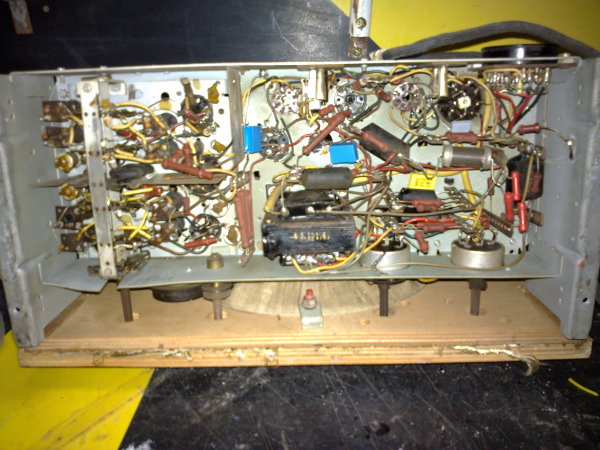
In this photo, you can see how the circuit looked with some of the paper capacitors already replaced:
I still didn’t have the tubes, and only about half of the capacitors had been replaced, but I did a test using the AZ1 replacement I made. For example, I found that paper capacitor C40 was giving a voltage of +6V when it should have been showing a negative voltage. If I had installed the new EBL21 tube without replacing that capacitor, it would have damaged the new tube.
A few days later, the remaining tubes and capacitors arrived. I replaced all the capacitors, installed the new tubes in their sockets, and powered on the radio… But it was still silent — the magic eye remained static.
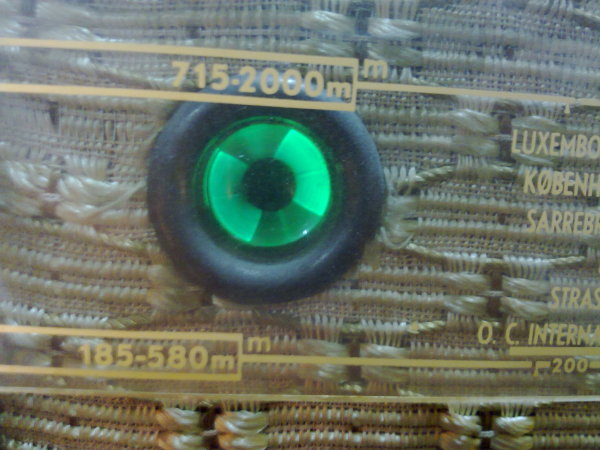
In this image, you can see how the magic eye looked:
However, when I touched the phono input, sound came through the speaker, which meant the problem was in the circuits related to the ECH21 and the EAF42s. After checking voltages, I discovered that the ECH21 had a grid short, so I ordered a new ECH21. Once I installed it, the radio finally worked perfectly.
In total, I had to replace 4 of the 6 tubes the radio uses — not counting the EM4, which is weak and has a very dim glow. However, new EM4s are quite expensive, so for now, it will stay with the worn-out one.
Finally, here is a photo of the restored and working chassis:
